Do you want to avoid your applications to deal with login forms, authenticating and managing users? Then an identity and access management (IAM) solution is what you need. Keycloak is an open source IAM widely used platform which can add authentication and authorization to applications with minimum effort. Features as social login, user federation, identity brokering are available out of the shelf.
In this article I’m going to describe which is the minimum configuration needed to bring Keycloak to life with Docker or docker-compose, and finally have your own development instance to start playing with. You will be able to setup Keycloak with a realm, create clients and users, authenticate them and generate JWT access tokens.
It is assumed that you have Docker and docker-compose already installed and ready to use.
Start Keycloak using Docker or doker-compose
One alternative to start Keycloak fast is to use the containerized Docker version. For example, you could start Keycloak using the command below and we’ll have a running instance right the way.
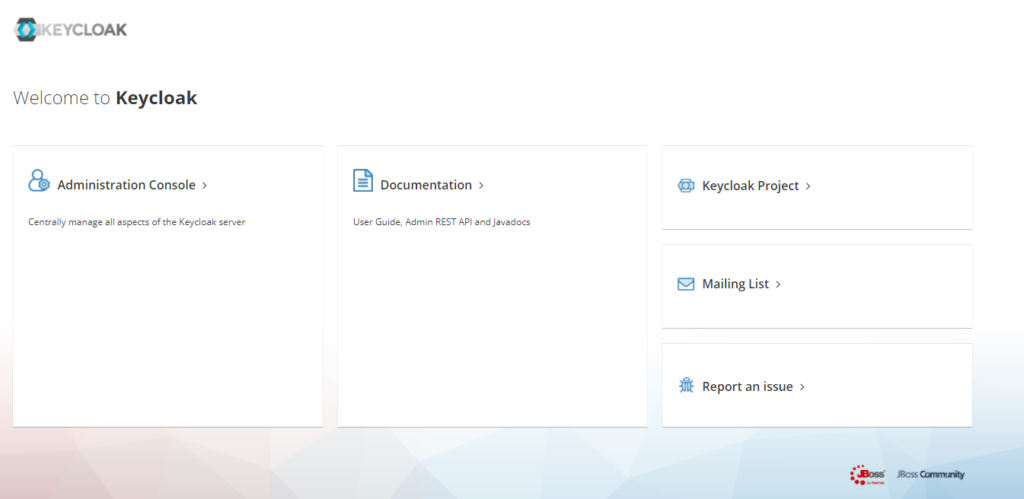
docker run -p 8080:8080 -e KEYCLOAK_USER=admin -e KEYCLOAK_PASSWORD=admin quay.io/keycloak/keycloak:11.0.2Keycloak v11.0.2 starts on port 8080 and then you could access to the HTTP administrative console and login with admin/admin credentials. Assuming that you install Keycloak on your localhost then the console is accessible at http://localhost:8080/auth. That’s all.
However, Keycload starts by default with H2 as internal database which is not recommended for production, therefore below you can find another example with a docker-compose YAML file where Keycloak is configured to start with postgres as underlying DB. Just bring the docker-compose YAML file up and the two containers with Keycloak and Postgres will spin up.
docker-compose up -dFollowing this link you can find other examples for MariaDB, Oracle or MSSQL databases.
version: '3'

volumes:
  postgres_data:
      driver: local

services:
  postgres:
      image: postgres
      volumes:
        - postgres_data:/var/lib/postgresql/data
      environment:
        POSTGRES_DB: keycloak
        POSTGRES_USER: keycloak
        POSTGRES_PASSWORD: password
  keycloak:
      image: quay.io/keycloak/keycloak:latest
      environment:
        DB_VENDOR: POSTGRES
        DB_ADDR: postgres
        DB_DATABASE: keycloak
        DB_USER: keycloak
        DB_SCHEMA: public
        DB_PASSWORD: password
        KEYCLOAK_USER: admin
        KEYCLOAK_PASSWORD: admin
      ports:
        - 8080:8080
      depends_on:
        - postgres
Configure Keycloak
Create a Realm
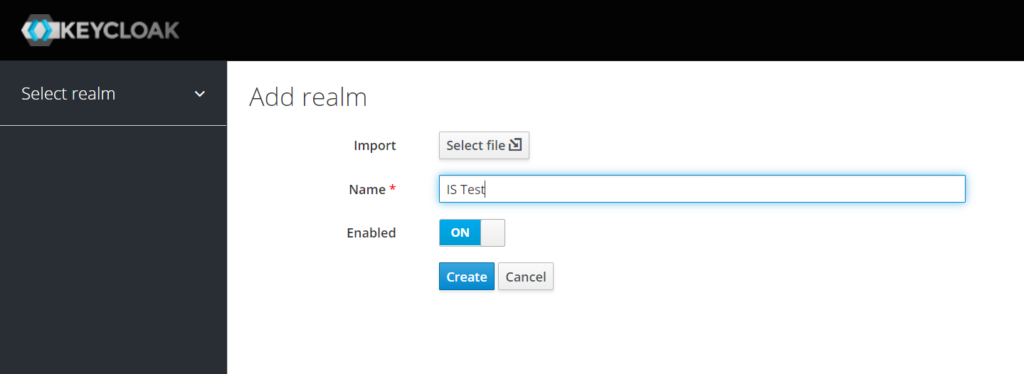
Assuming your Keycloak instance runs on localhost, login to the Administrative Console at http://localhost:8080/auth then create a Realm. In Keycloak terminology a Ream is similar to a tenant. A realm groups a set of users, roles and settings.
Add a client
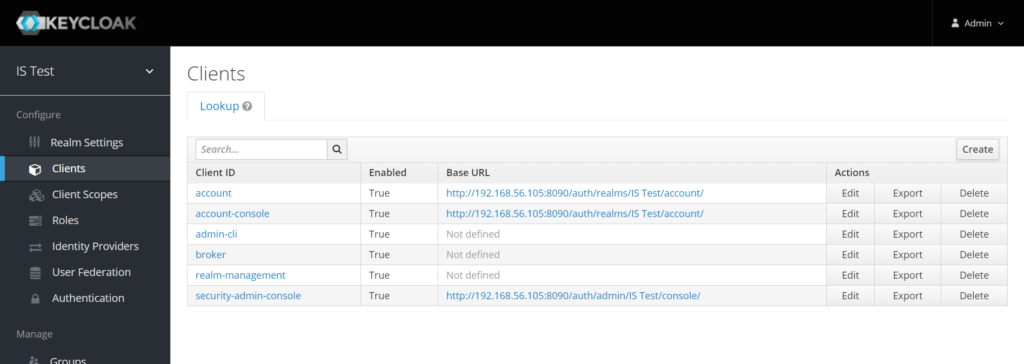
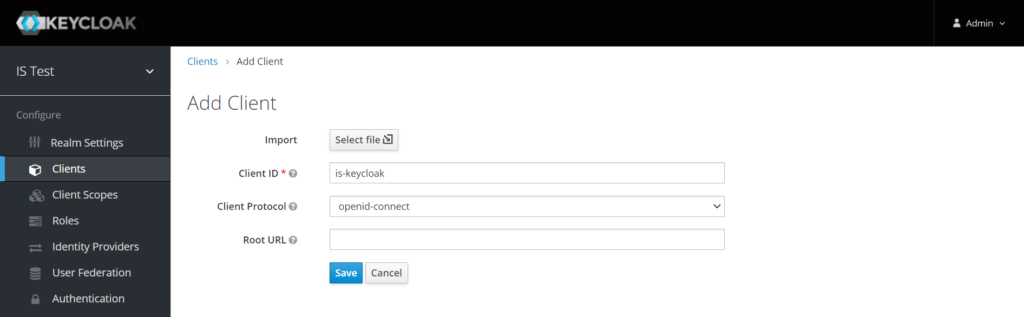
In order to make your external applications to use Keycloak to secure themselves then it’s needed to create a client. Clients are entities that can request Keycloak to authenticate a user. Go to Clients main menu and then click Create.
You have to provide a client ID (is-keyloak in my example) and pick openid-connect as authentication protocol. More info about OpenID connect here
Then you have to change the Access Type to confidential from the dropdown box and click ON buttons for Authorization and Service Accounts fields. The last one will allow your client to authenticate to Keycloak and retrieve access tokens dedicated to this client.

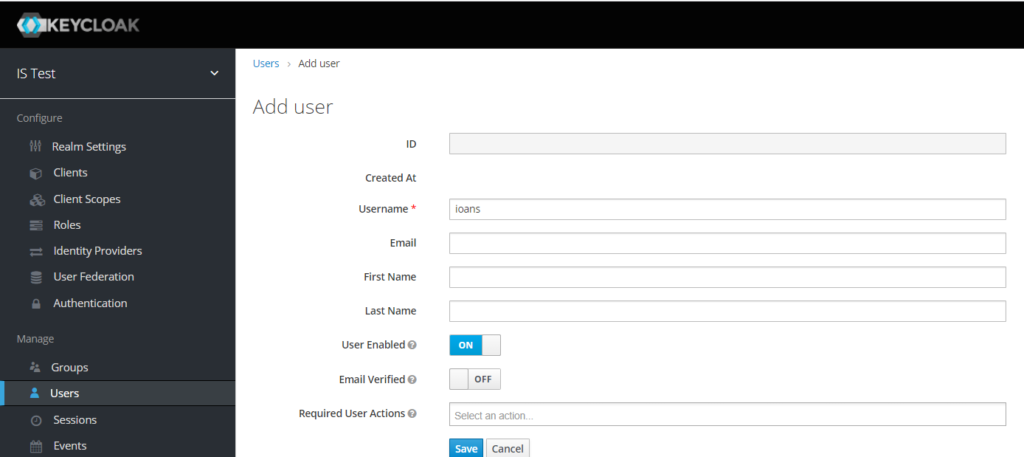
Add a user
The last think you need before starting playing around is to create a user. Users are entities that are able to log into your application. They can have attributes associated with themselves like email, username, address, phone number, and birth day. They can be assigned group membership and have specific roles assigned to them.
Go to Users menu and then click on Add User

Type a username and then click Save. As username you’re not forces to use and email or something else. Just pick whatever is convenient for you and go ahead with the credentials.
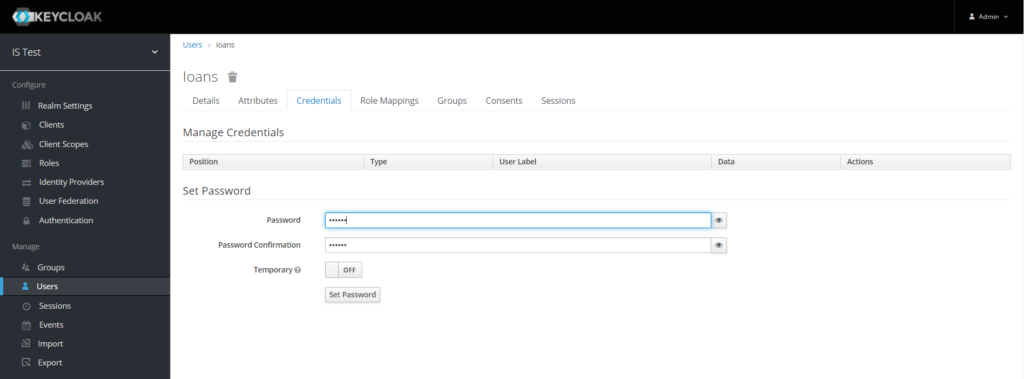
From the Credentials tab set a password for your user and click OFF on temporary to avoid changing the password after the first login. Finally click Set Password button and you’re good to go.
Test the connectivity with CURL
You can check now if the user you’ve just created can authenticate into Keycloak. For that you could use CURL. You need to send a POST request using the format below. Note that the URL contains the realm name.
curl --request POST '<KEYCLOAK_SERVER_URL>/auth/realms/<REALM_NAME>/protocol/openid-connect/token' \
 --header 'Content-Type: application/x-www-form-urlencoded' \
 --data-urlencode 'client_id=<CLIENT_ID>' \
 --data-urlencode 'client_secret=<CLIENT_SECRET>' \
 --data-urlencode 'grant_type=password' \
 --data-urlencode 'username=<USERNAME>' \
 --data-urlencode 'password=<PASSWORD>'
Here is an concrete example for my setup. The client secret is could be found under Credentials section for your client.

curl --request POST 'http://192.168.56.105:8090/auth/realms/IS%20Test/protocol/openid-connect/token' \
--header 'Content-Type: application/x-www-form-urlencoded' \
--data-urlencode 'client_id=is-keycloak' \
--data-urlencode 'client_secret=cff1bdcd-05e7-4862-a670-2a8b79a7721c' \
--data-urlencode 'grant_type=password' \
--data-urlencode 'username=ioans' \
--data-urlencode 'password=secret'
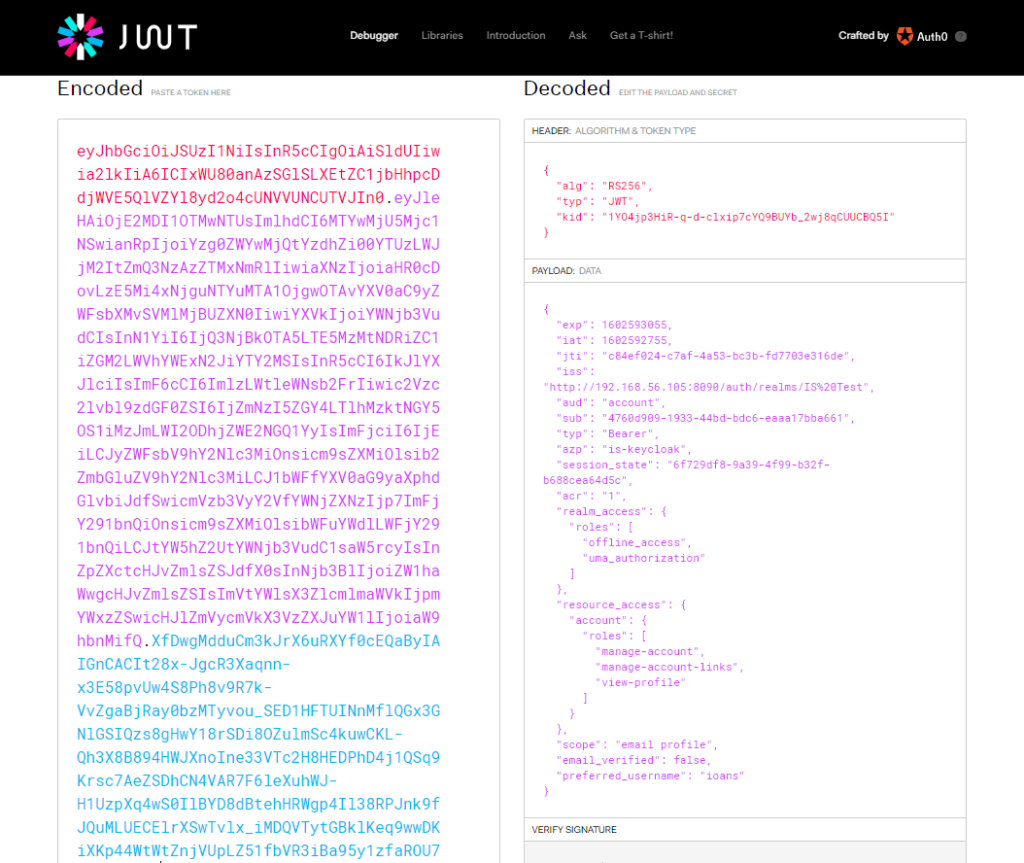
If everything goes fine you get a 200 OK response with the JWT access token as part of the response. See an example below:
{
    "access_token": "eyJhbGciOiJSUzI1NiIsInR5cCIgOiAiSldUIiwia2lkIiA6ICIxWU80anAzSGlSLXEtZC1jbHhpcDdjWVE5QlVZYl8yd2o4cUNVVUNCUTVJIn0.eyJleHAiOjE2MDI1OTMwNTUsImlhdCI6MTYwMjU5Mjc1NSwianRpIjoiYzg0ZWYwMjQtYzdhZi00YTUzLWJjM2ItZmQ3NzAzZTMxNmRlIiwiaXNzIjoiaHR0cDovLzE5Mi4xNjguNTYuMTA1OjgwOTAvYXV0aC9yZWFsbXMvSVMlMjBUZXN0IiwiYXVkIjoiYWNjb3VudCIsInN1YiI6IjQ3NjBkOTA5LTE5MzMtNDRiZC1iZGM2LWVhYWExN2JiYTY2MSIsInR5cCI6IkJlYXJlciIsImF6cCI6ImlzLWtleWNsb2FrIiwic2Vzc2lvbl9zdGF0ZSI6IjZmNzI5ZGY4LTlhMzktNGY5OS1iMzJmLWI2ODhjZWE2NGQ1YyIsImFjciI6IjEiLCJyZWFsbV9hY2Nlc3MiOnsicm9sZXMiOlsib2ZmbGluZV9hY2Nlc3MiLCJ1bWFfYXV0aG9yaXphdGlvbiJdfSwicmVzb3VyY2VfYWNjZXNzIjp7ImFjY291bnQiOnsicm9sZXMiOlsibWFuYWdlLWFjY291bnQiLCJtYW5hZ2UtYWNjb3VudC1saW5rcyIsInZpZXctcHJvZmlsZSJdfX0sInNjb3BlIjoiZW1haWwgcHJvZmlsZSIsImVtYWlsX3ZlcmlmaWVkIjpmYWxzZSwicHJlZmVycmVkX3VzZXJuYW1lIjoiaW9hbnMifQ.XfDwgMdduCm3kJrX6uRXYf0cEQaByIAIGnCACIt28x-JgcR3Xaqnn-x3E58pvUw4S8Ph8v9R7k-VvZgaBjRay0bzMTyvou_SED1HFTUINnMflQGx3GNlGSIQzs8gHwY18rSDi8OZulmSc4kuwCKL-Qh3X8B894HWJXnoIne33VTc2H8HEDPhD4j1QSq9Krsc7AeZSDhCN4VAR7F6leXuhWJ-H1UzpXq4wS0IlBYD8dBtehHRWgp4Il38RPJnk9fJQuMLUECElrXSwTvlx_iMDQVTytGBklKeq9wwDKiXKp44WtWtZnjVUpLZ51fbVR3iBa95y1zfaROU7mki-34bJQ",
    "expires_in": 300,
    "refresh_expires_in": 1800,
    "refresh_token": "eyJhbGciOiJIUzI1NiIsInR5cCIgOiAiSldUIiwia2lkIiA6ICIxYmNiYzM1ZS03MTI3LTQ4M2ItYmE1Yy1jYTZkMzJjYWMxNGIifQ.eyJleHAiOjE2MDI1OTQ1NTUsImlhdCI6MTYwMjU5Mjc1NSwianRpIjoiMGVmNWE4YjYtNDNiZi00NDQzLWI0ZjMtNjgxMjE3YjhlMzIxIiwiaXNzIjoiaHR0cDovLzE5Mi4xNjguNTYuMTA1OjgwOTAvYXV0aC9yZWFsbXMvSVMlMjBUZXN0IiwiYXVkIjoiaHR0cDovLzE5Mi4xNjguNTYuMTA1OjgwOTAvYXV0aC9yZWFsbXMvSVMlMjBUZXN0Iiwic3ViIjoiNDc2MGQ5MDktMTkzMy00NGJkLWJkYzYtZWFhYTE3YmJhNjYxIiwidHlwIjoiUmVmcmVzaCIsImF6cCI6ImlzLWtleWNsb2FrIiwic2Vzc2lvbl9zdGF0ZSI6IjZmNzI5ZGY4LTlhMzktNGY5OS1iMzJmLWI2ODhjZWE2NGQ1YyIsInNjb3BlIjoiZW1haWwgcHJvZmlsZSJ9.igm8BHoVr43BOCvUQlMO4Z9vlJgEVya81o4doQGYhRo",
    "token_type": "bearer",
    "not-before-policy": 0,
    "session_state": "6f729df8-9a39-4f99-b32f-b688cea64d5c",
    "scope": "email profile"
}
On jwt.io website you could decode the response JWT access token and see details like the expiration time, issuer, users roles etc.
Hope this article helped you to quickly setup a basic configuration and understand the necessary steps to integrate your clients with Keycloak.