Whenever I contribute to an existing project I start off by reading the code repository history. It’s a way to understand the project evolution and how the code changed over time. Besides this it gives you an idea about how well the project is organized, which are the major bugs and bottlenecks etc. However, I could rarely find projects which maintain a clean history. The reasons are many, but one is that the commit messages are not properly formulated. In this article I’m going to exemplify my view about good commit messages in GIT.
One way to think about GIT commit messages is like fingerprints you leave on the code changes and they should be meaningful for someone who reads them after a year or more. The context it’s also important because it often happens to check how a particular class evolved over time and which were the commits which impacted that class. If it takes you more that a blink of an eye to understand it then this is a sign to reconsider the commit message. One good comparison is with traffic signs. If it takes more that a blink of an eye to understand the signs in a road-cross while you drive then the road designers should either simplify the signs or even change the road infrastructure. Otherwise the risk of accidents increases drastically.
Example of bad commit messages
fixed broken stuff
fixed broken stuff - part2
Well, it’s good you fixed something, but what exactly did you fix? The commit message should contains more details about what has been fixed. More, when we are in a hurry or lazy we don’t provide a new commit message in case we forgot something. We normally rely on IDE and use the same changelist with the same commit message for something we omitted previously.
Update API with 3345. Fix malformed request
Here it’s better. At least it seems there are more details. But what 3345 is? Did the API’s update fix a bug implicitly? Or are there two separate changes wrapped in a single commit? One with the API update and the other one with a fix for a some malformed request. But which request?
Proper GIT commit messages
I’ll stick with the examples above.
[FIX] Close server connection properly #788 [see details]

- close socket and return to the connection poll
- checks for null pointer exceptions
- unit tests for socket handlers
The commit message from above it’s more verbose and it offers a clear view about the changes. It’s not needed to be very technical to understand what the commit is all about. The first line states there is a fix for a bug related to server connectivity problem. At the end there is a reference to a GitHub issue (#788) and then it invites the reader to check for more details in case he wants to go deeper.
Those additional details are written on separate lines as a hyphen list. It’s actually the body of the commit message which is quite difficult to write with the -m option of git commit using the command line. You are better off writing the message into a text editor or your IDE.
It is commonly used to provide a GitHub or Jira ticket reference in case there is used such a platform for your project. Those references are automatically shortened and converted into links for easy navigation.
[IMPLEMENT] API support for image upload #3345
Now it’s clear that that the commit is about API extension to support images uploads. Similarly, it points to a reference (#3345) for more details about the feature. In this case there are no additional details, but this is perfectly fine. Notice that you could annotate the commit messages with something like [FIX], [IMPLEMENT], [FEATURE], [UPDATE] to make it clearer what is all about. There is no rule here, they work as tags and should be meaningful enough. You could pick whatever you want as long as they are widely adopted along the project and understood by everyone.
Use a linter. But be cautious
All I have written above are suggestions to make your code repository history more organized and clearer, but don’t get too obsessed with it. The point is to get better but not overcomplicate the development process. Try to discuss it before with your teammates or managers. In case they find it too cumbersome don’t insist. Try to improve your own commits messages and stick with that.
Some projects use tools to check the commit messages style before pushing them to the remote repository. Such tools could be relatively easy integrated with GIT or GitHub (see actions).
In general, these linters validate that your commits messages follow a predefined style, like:
the commit message title doesn’t exceed a max length
the title has no trailing whitespaces
second line is empty. Notice from my example above that there is a space between the title and commit message body
The scope of this article is to offer an introduction to the Keycloack Java API. I’m using a Spring Boot application where I created a REST controller which performs basic user management operations. The source code of the project could be found on GitHub at https://github.com/ioansurariu/keycloak
My application in Maven driven and it uses Spring Security and Spring Keycloak starters as dependencies therefore your are going to see into the project pom.xml file the dependency structure as below. I’m using Keycloak version 11.0.0
The application plays the role of a Keycloak client and it uses keycloak-admin-client library to connect to the Keycloak Admin REST API. The full documentation for the REST API could be found here.
To use the app you need Maven and a Keycloak server running. If you don’t have already a Keycloak server just read my article where I described how to get started using Docker.
In order to run the app just compile it with Maven and then simply shoot the command
./mvnw spring-boot:run
In the application.yaml file you find the app configuration, including the port number where the embedded Tomcat web-server starts (8888 in my case) and the Keycloak client configuration.
For the Keycloak client configuration it’s mandatory to specify the realm (IS Test), the address where it runs (http://192.168.56.105:8090/auth) and the resource (is-keycloak). The resource actually corresponds to the client name you created under your realm to allow external applications to use Keycloak as an authentication point.
# General setting
is:
  keycloak:
    admin:
      user: admin
      password: admin
server:
  port: 8888

# Keycloak settings
keycloak:
  realm: IS Test
  auth-server-url: http://192.168.56.105:8090/auth
  ssl-required: none
  resource: is-keycloak
  use-resource-role-mappings: true
  bearer-only: true
  cors: true
  principal-attribute: preferred_username
Spring Security web configuration
Since my application uses Spring Security it requires a web security configuration class that extends WebSecurityConfigurerAdapter. Keycloak provides KeycloakWebSecurityConfigurerAdapter as a convenient base class for this.
@Configuration
@EnableWebSecurity
@ComponentScan(basePackageClasses = KeycloakSecurityComponents.class)
public class SpringSecurity extends KeycloakWebSecurityConfigurerAdapter {
    @Autowired
    public void configureGlobal(AuthenticationManagerBuilder auth) {
        KeycloakAuthenticationProvider authenticationProvider = keycloakAuthenticationProvider();
        authenticationProvider.setGrantedAuthoritiesMapper(new SimpleAuthorityMapper());
        auth.authenticationProvider(authenticationProvider);
    }

    @Bean
    public KeycloakSpringBootConfigResolver keycloakConfigResolver() {
        return new KeycloakSpringBootConfigResolver();
    }

    @Bean
    @Override
    protected SessionAuthenticationStrategy sessionAuthenticationStrategy() {
        return new RegisterSessionAuthenticationStrategy(new SessionRegistryImpl());
    }

    @Override
    protected void configure(HttpSecurity http) throws Exception {
        super.configure(http);
        http.cors().and().csrf().disable();
        http.authorizeRequests()
                .anyRequest()
                .permitAll();
    }
}
I won’t go into too much details but it worth mentioning that method configureGlobal() enables SimpleAuthorityMapper class to make sure the users’ roles are not prefixed with keyword ‘ROLE_’.
The another method, keycloakConfigResolver defines that we want to use the Spring Boot properties file support instead of the default keycloak.json. Therefore you could find all the Keycloak configuration under applicaiton.yaml file for my project.
Finally, method sesessionAuthenticationStrategy() indicates that all the sessions are registered on the Spring security context and configure() says that all the HTTP requests are permitted in order to ease the setup.
Java examples for Keycloak Admin REST API
In src/main/java/ro/surariu/ioan/controller/KeycloakController.java class you find a REST controller with several endpoints which exemplifies how to use the Keycloak Admin REST API to control user management or roles.
Create user
@PostMapping("/user")
public ResponseEntity<String> createUser(@RequestParam String username, @RequestParam String password) {
	if (StringUtils.isEmpty(username) || StringUtils.isEmpty(password)) {
		return ResponseEntity.badRequest().body("Empty username or password");
	}
	CredentialRepresentation credentials = new CredentialRepresentation();
	credentials.setType(CredentialRepresentation.PASSWORD);
	credentials.setValue(password);
	credentials.setTemporary(false);
	UserRepresentation userRepresentation = new UserRepresentation();
	userRepresentation.setUsername(username);
	userRepresentation.setCredentials(Arrays.asList(credentials));
	userRepresentation.setEnabled(true);
	Map<String, List<String>> attributes = new HashMap<>();
	attributes.put("description", Arrays.asList("A test user"));
	userRepresentation.setAttributes(attributes);
	Keycloak keycloak = getKeycloakInstance();
	Response result = keycloak.realm(keycloakRealm).users().create(userRepresentation);
	return new ResponseEntity<>(HttpStatus.valueOf(result.getStatus()));
}
Do you want to avoid your applications to deal with login forms, authenticating and managing users? Then an identity and access management (IAM) solution is what you need. Keycloak is an open source IAM widely used platform which can add authentication and authorization to applications with minimum effort. Features as social login, user federation, identity brokering are available out of the shelf.
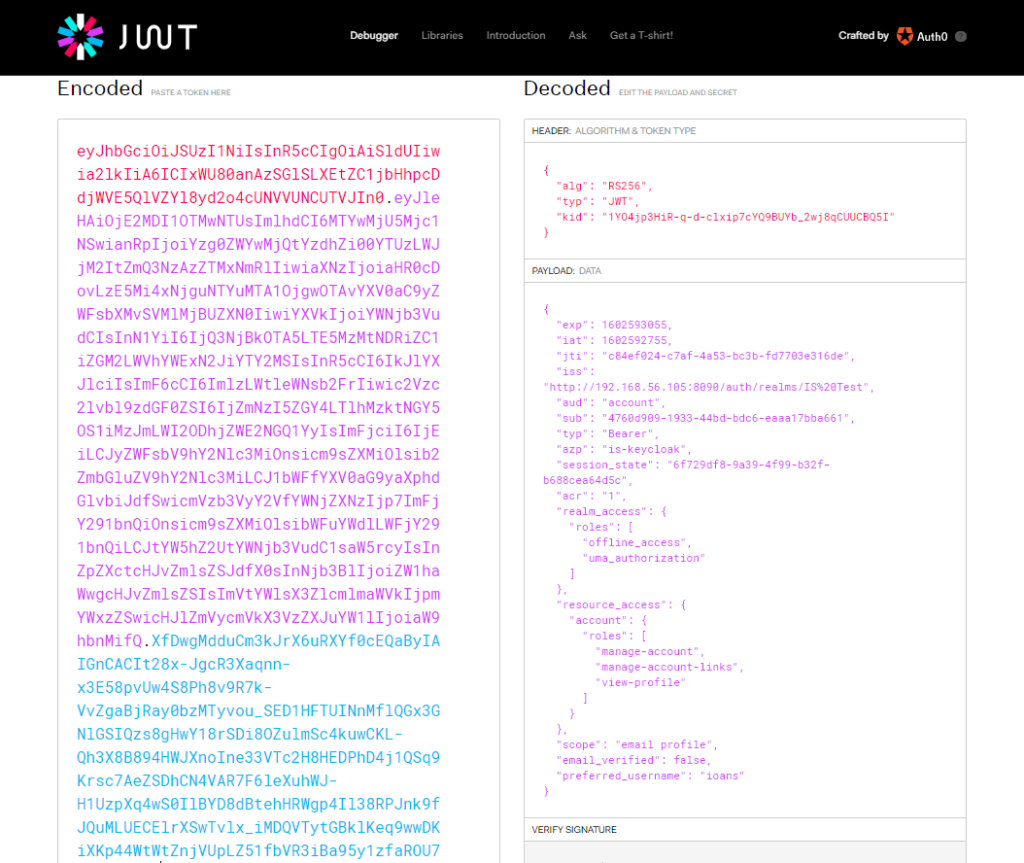
In this article I’m going to describe which is the minimum configuration needed to bring Keycloak to life with Docker or docker-compose, and finally have your own development instance to start playing with. You will be able to setup Keycloak with a realm, create clients and users, authenticate them and generate JWT access tokens.
It is assumed that you have Docker and docker-compose already installed and ready to use.
Start Keycloak using Docker or doker-compose
One alternative to start Keycloak fast is to use the containerized Docker version. For example, you could start Keycloak using the command below and we’ll have a running instance right the way.
docker run -p 8080:8080 -e KEYCLOAK_USER=admin -e KEYCLOAK_PASSWORD=admin quay.io/keycloak/keycloak:11.0.2
Keycloak v11.0.2 starts on port 8080 and then you could access to the HTTP administrative console and login with admin/admin credentials. Assuming that you install Keycloak on your localhost then the console is accessible at http://localhost:8080/auth. That’s all.
However, Keycload starts by default with H2 as internal database which is not recommended for production, therefore below you can find another example with a docker-compose YAML file where Keycloak is configured to start with postgres as underlying DB. Just bring the docker-compose YAML file up and the two containers with Keycloak and Postgres will spin up.
docker-compose up -d
Following this link you can find other examples for MariaDB, Oracle or MSSQL databases.
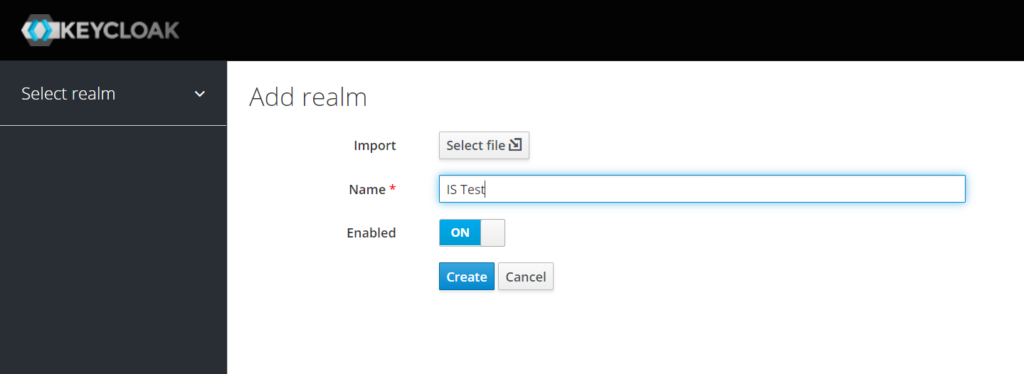
Assuming your Keycloak instance runs on localhost, login to the Administrative Console at http://localhost:8080/auth then create a Realm. In Keycloak terminology a Ream is similar to a tenant. A realm groups a set of users, roles and settings.
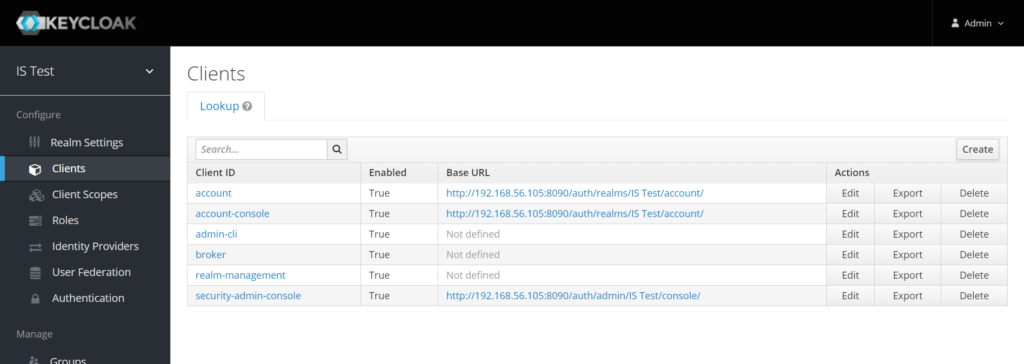
Add a client
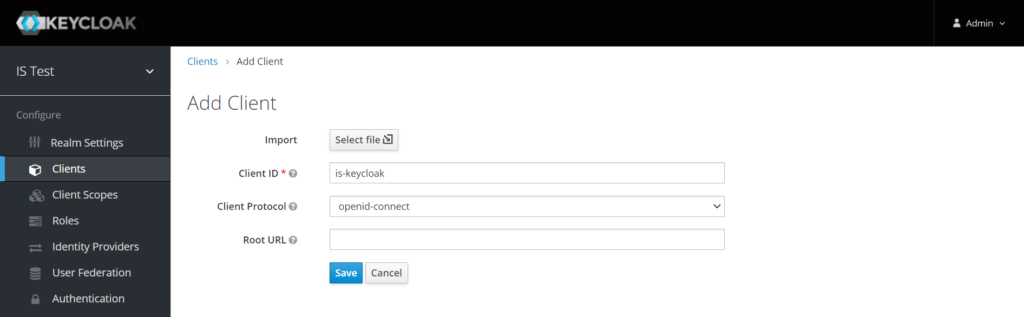
In order to make your external applications to use Keycloak to secure themselves then it’s needed to create a client. Clients are entities that can request Keycloak to authenticate a user. Go to Clients main menu and then click Create.
You have to provide a client ID (is-keyloak in my example) and pick openid-connect as authentication protocol. More info about OpenID connect here
Then you have to change the Access Type to confidential from the dropdown box and click ON buttons for Authorization and Service Accounts fields. The last one will allow your client to authenticate to Keycloak and retrieve access tokens dedicated to this client.
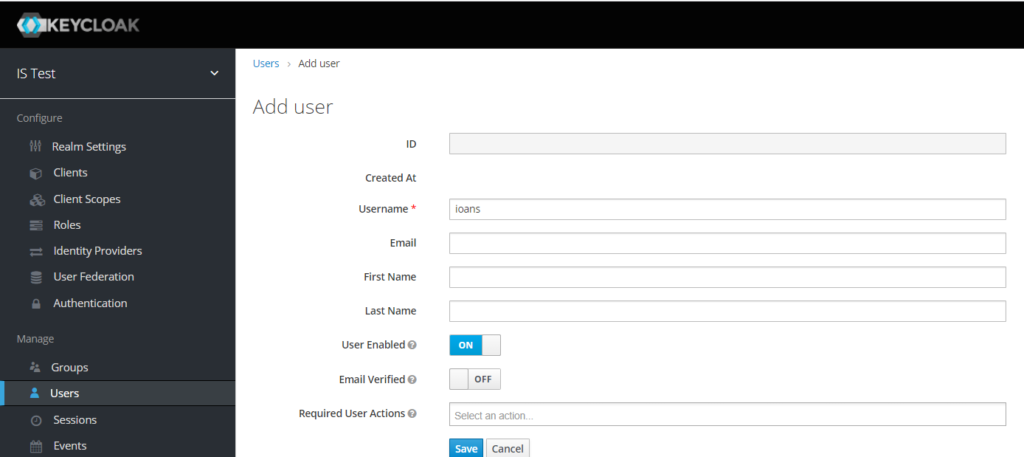
Add a user
The last think you need before starting playing around is to create a user. Users are entities that are able to log into your application. They can have attributes associated with themselves like email, username, address, phone number, and birth day. They can be assigned group membership and have specific roles assigned to them.
Go to Users menu and then click on Add User
Type a username and then click Save. As username you’re not forces to use and email or something else. Just pick whatever is convenient for you and go ahead with the credentials.
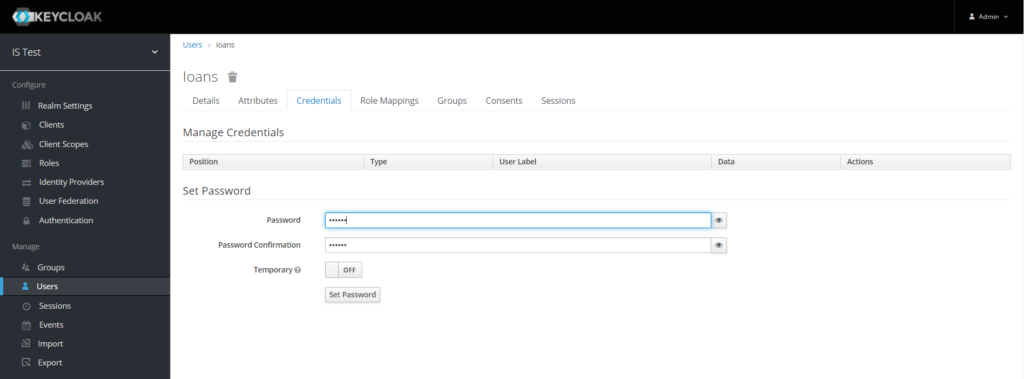
From the Credentials tab set a password for your user and click OFF on temporary to avoid changing the password after the first login. Finally click Set Password button and you’re good to go.
Test the connectivity with CURL
You can check now if the user you’ve just created can authenticate into Keycloak. For that you could use CURL. You need to send a POST request using the format below. Note that the URL contains the realm name.
You can use SSH protocol to connect and authenticate to remote GitHub servers. Using SSH keys you can authenticate to GitHub without providing your credentials every time you connect.
It’s common that you need to connect to different GitHub servers from the same computer simultaneously. It could be your personal account to github.com and the one from work, like work.github.com or any other remote GitHub server. Anyway, how to configure your SSH client to support this setup it’s not so straight forward. I’m describing below the steps to follow to accomplish this.
Generate a new SSH for your GitHub account
From Git Bash generate a new public/private RSA key using ssh-keygen as below. You need to provide the email address for your GitHub account.
When you’re prompted, enter a file name where you want to save the keys and a secure passphrase. Let’s say yougenerate a key for your personal GitHub account and name it id_rsa_personal. Public (id_rsa_personal.pub) and private (id_rsa_personal) keys are generated. Then upload them to your GitHub server.
More details about generating SSH keys and how to add new SSH key to your GitHub account here.
Add the new SSH keys to .ssh home folder
Copy your newly SSH keys to ~/.ssh folder. Assuming you generated a key for your personal account in GitHub and that you already have another one for your work account, you should have under ~/.ssh folder 4 files.
If you don’t have it already create a ~/.ssh/config file and add the following to it. I still assume that you have 2 accounts, the personal one and the other for work. As shown below you need to provide the host addresses and usernames for your accounts. It is also important to specify the right SSH keys to be used for each account using IdentityFile property (highlighted below).
# Work account
Host work github.work.com
 HostName github.work.com
 IdentityFile ~/.ssh/id_rsa
 User work_user

# Personal account
Host personal github.com
 HostName github.com
 IdentityFile ~/.ssh/id_rsa_personal
 User personal_user
Check the connectivity and troubleshoot
In order to check the connectivity to your GitHub servers using SSH-RSA keys run the command below.
ssh -vT git@github.com
It runs in verbose mode just to provide you all the details in case you need to troubleshoot later. You need to specify the GitHub host, in my case github.com and git as username. Don’t use your GitHub account username, it won’t work. Just git as above.
If you get the message You've successfully authenticated, but GitHub does not provide shell access. then you’re all good. Your setup is correct and you could carry on to clone repositories or interact with your GitHub remotes using RSA keys.
In case the command returns git@github.com: Permission denied (publickey) then check once again your SSH config file and make sure the right RSA key is is used for your server.
OpenSSH_7.9p1, OpenSSL 1.1.1a  20 Nov 2018
debug1: Reading configuration data ~/.ssh/config
...
debug1: Host 'github.com' is known and matches the RSA host key.
debug1: Found key in ~/.ssh/known_hosts:4
debug1: rekey after 134217728 blocks
debug1: SSH2_MSG_NEWKEYS sent
debug1: expecting SSH2_MSG_NEWKEYS
debug1: SSH2_MSG_NEWKEYS received
debug1: rekey after 134217728 blocks
...
debug1: SSH2_MSG_SERVICE_ACCEPT received
debug1: Authentications that can continue: publickey
debug1: Next authentication method: publickey
debug1: Offering public key: ~/.ssh/id_rsa_personal RSA SHA256:9lQpW+Fadq8+ORpWHFXsYJsD0p8r explicit
debug1: Server accepts key: ~/.ssh/id_rsa_personal RSA SHA256:9lQpW+Fadq8+ORpWHFXsYJsD0p8rv explicit
debug1: Authentication succeeded (publickey).
...
You've successfully authenticated, but GitHub does not provide shell access.
debug1: client_input_channel_req: channel 0 rtype exit-status reply 0
debug1: channel 0: free: client-session, nchannels 1
Transferred: sent 3488, received 2724 bytes, in 0.2 seconds
Bytes per second: sent 15908.8, received 12424.2
debug1: Exit status 1